
A Step By Step Guide To Publishing Your First Blog Post In WordPress

By Prebuilt Sites Team
December 15, 2021
EDITOR’S NOTE: If you’re completely new to WordPress and looking to publish your first blog post, this step by step guide is for you! If you’ve been writing blog posts for a while then you’ll be able to take away some tips to make sure you’re following good practices when publishing blog posts. Write a rough draft of your blog post on a Google or Word doc and then transfer it over to the text editor on WordPress by adding a new post. Add in relevant internal and external links. Now you can start editing. Read your post out loud while you check for grammar, spelling, structure, and readability. Add in relevant images, and an attention grabbing title. Select a category for your post to appear in, hit the blue publish button, and your post will be live for the world to see! If you have any questions about publishing a blog post or want us to do it for you, reach out at The BBS Agency. We’d love to help you out!
WordPress comes with a bit of a learning curve, but once you get the hang of it, it’s super easy to navigate and write and publish blog posts in no time!
We’re going to cover content, proofreading, images, categories, and more!
For most of you, you will have already created your WordPress website and are just looking to write a blog post.
If you still haven’t created your WordPress website, please check out our step-by-step guide on how to start a blog.
I remember the first time I logged into the dashboard of a WordPress website. I thought I had been given access to controls of a nuclear power-plant.
To say that I was intimidated would be an understatement.
So much so, that I ran back to using my Wix website for a while because WordPress seemed too hard.
THAT was a huge mistake.
The time that I wasted on other blogging platforms like Wix and Squarespace was time that I should have been learning WordPress.
There’s a reason 27% of the INTERNET is run on WordPress.
And looking back, WordPress is really not that complicated once you get the hang of it. There is just a slight learning curve that takes time and a little patience.
Fast forward to today, and Lauren and I LOVE Wordpress!
It’s the only blogging platform we use and recommend to our students. It’s also what we run both of our six-figure blogs on.
My goal for this post is to take out the complexity and help you write your first WordPress blog post, the right way.
I know this guide might be a little long for a newbie, but hear me out…
The goal is to help you establish good habits and practices when publishing blog posts, so you don’t have to change anything later on.
Begin with the end in mind, right?
How to Write a Blog Post – Initial Setup
These are the steps you should take to create not only your first post but all of your future posts.
For all of you preferred video learners out there, here is a video of this topic from our YouTube Channel below.

Start Writing in Microsoft Word (or other Doc Software)
This step is optional, but I personally think it’s better to start writing in Word. There are fewer distractions on your screen and you can write offline.
But whatever helps you focus is what’s most important.
Keyword Research
This step is also optional for your first post because it’s usually just about generating excitement for your new blog!
For regular blog posts, it’s a good idea to use keyword research tools to help you find topics that people are actively searching for.
Here are a few of our favorites:
- Ubersuggest
- Pinterest search (if you plan to use Pinterest to drive traffic)
- Moz Keyword Planner
When you write about topics people are actively searching for, it can help you get organic (free) traffic from search platforms like Google and Pinterest.
When you have your keywords selected, type them into the top of the Word document.
This is a friendly reminder to include those keywords throughout your blog post where relevant, which also helps your content rank for those keywords in search algorithms.
But for your FIRST post, you really don’t need these, because we recommend your first post be about yourself and why you started!
Write Your Rough Draft
Every post that you write should have a purpose.
For this post, my purpose was “to help complete beginners publish their first WordPress blog post and be able to repeat the process for future posts.”
Without a purpose, you’re just wasting your own time and that of your readers! Remember that your content should always be aimed to help others.
Your first post should be short and convey a few ideas in just a few sentences:
- How excited you are about starting
- The purpose of your blog and what you are hoping to accomplish
- Your current feeling about your blog and some of your goals
Remember to think of your AUDIENCE. You should discuss why you want to share your knowledge and how you think you can help others.
The goal of your first post is to have something to look back on and smile about when have reached your blogging goals 🙂
Here’s an example (if you had a parenting blog):
“Hey, y’all! My name is “your name,” and I’m SO excited to announce that I have finally started my blog on parenting! I have learned so much about being a mom and raising 3 kids — the what to do — and the what to DEFINITELY NOT do!
I want to document my own journey and use my experiences to help new moms adapt to the crazy lifestyle that comes with being a new parent.
My goal is to turn this blog into a full-time income as well, so I can support my family and bring my husband home. But for now, I’m just excited to get started.
Thanks for being here and reading this! And thank you to my homeboy Alex Nerney from createandgo.com for being so smart and handsome and suave and helping me make my first post.”
Haha okay… you can probably eliminate that last line, but you get the idea!
Your first post should be fun and is a great way to introduce yourself!
Add Any Relevant Links
Including internal links to your other blog posts as well as external links to other related information and resources can also help your content rank better in search.
You might not have many or any links in this very first blog post, but you will in the future.
Check out the links in this article to get an idea of how it’s done.
You can add your links into Word while you are writing or you can add them in WordPress when you are editing and finalizing your blog post.
Sometimes it’s easier to do it in Word if you are researching and using someone else’s content as a reference or an example and you already have the link on hand.
How to Link Another Post or Website in Your WordPress Blog Post
Highlight the text that you want to add the hyperlink to, and then click the hyperlink icon on the toolbar:
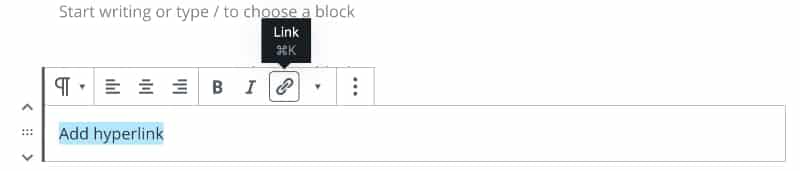
Photo: Create And Go
Paste the copied URL into the box that comes up.
A shortcut to this process is to highlight the text that you want to add the hyperlink to and hold the buttons “Control + V” to insert the copied URL.
Pro Tip: Make sure to also edit the settings for the link that you added and make it open up in a new window.
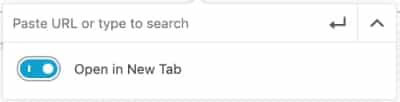
Photo: Create And Go
Generally, all internal links (to your pages) and external links (to other websites) should open up in a new window EXCEPT for links to your sales pages.
Sales pages should open up in the same window because you want your users focused one thing ONLY, and that is your product/service.
Final note about links: You should have BOTH internal and external links in your post.
Internal links help readers stay on your blog and find other useful content, and external links provide credibility and helpful resources to your posts.
How to Edit a Blog Post
As far as editing goes, make sure to read over your article with a fresh set of eyes (at least a few hours after writing).
Read it once to proofread for grammar and spelling. Read it twice to make sure that your message makes sense and comes across the way that you want it to.
We use a tool called Grammarly to help catch grammatical mistakes.
You can either upload a Word document to Grammarly or you can install the browser extension that will highlight mistakes directly in WordPress.
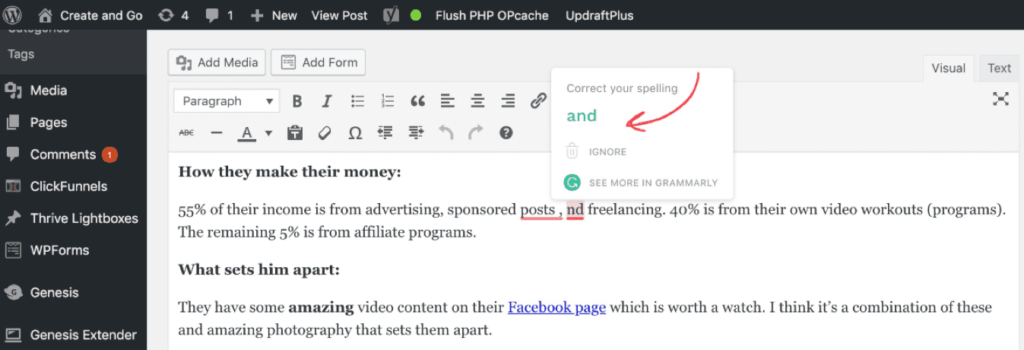
Photo: Create And Go
Grammarly has a great free version, and you won’t likely need to pay for it unless you need a lot of extra help.
Okay, now it’s officially time to publish your WordPress blog post!
How to Publish a Blog Post in WordPress
Note that posts remain in “draft mode” and invisible to everyone but you until you actually click the Publish button.
Writing and editing/publishing are two very different tasks, and it’s usually better to accomplish them at different times.
Writing can be mentally draining, and you want to edit your posts with a fresh set of eyes.
The next few steps also take some time as well, so it ends up being a separate process from writing — especially when you have to add images and other elements to your blog posts.
Go to www.yourblogname.com/wp-admin (substitute “yourblogname” with your own domain name), and enter your login information.
If you have forgotten it, you can go back and get it from your host.
If you’re using Bluehost, which is what we recommend, here’s how to get it:
- Login into your account at bluehost.com.
- Click “Wordpress Tools.”
- Click “Users.”
- Finally, click “login,”
Wahoo, you are in!
Add a New Post
Hover over “posts,” and click “add new,” (or click the “+ New” icon on the top bar of your WP dashboard.
Next, copy your article title and content from Word into WordPress.
You can choose whatever title you want for this first post. For future posts.
Make sure to use your main keywords from your keyword research in the title of your blog posts and preferable in the URL as well.
After you have copied the content in WP, click “Save Draft,” and then click “Preview” to see what it looks like!
The preview will open in a new window, and you can now edit the post to make it look how you want.
This includes adding images and making everything look sexy.
How to Add Images to a Blog Post in WordPress
To add an image to a blog post, simply click the plus icon below the block you are writing in and select the “Image” button from the available blocks.
Then you can choose to upload an image or select an existing image from your media library:
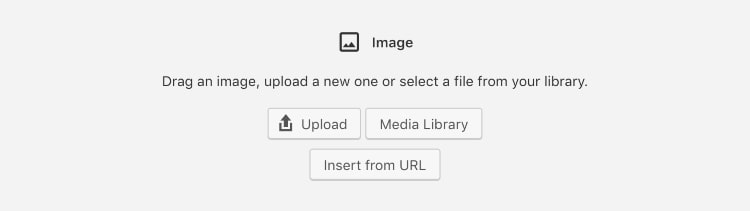
Photo: Create And Go
You can also resize the image within WordPress and align it left, right, or center.
It’s also a good idea to add a couple of words to describe the image to the “alt text” section over on the right side of the page. This helps with getting organic traffic from search engines.
For example, the alt text for the image above is just “add image to WordPress.”
Short and descriptive.
Before you upload images to WordPress, make sure to resize them a tool like BeFunky and then compress them with a tool like Optimizilla.
Images should be resized and compressed as much as possible without too losing too much quality to keep the file sizes small and your website loading faster.
Also Read: Free Blog Images: 9 Best Sites to Grab Beautiful Stock Images
How to Add Categories to a Blog Post in WordPress
Categories are what separates your content into different sections or “sub-niches.”
While a lot of the blog posts that you write will fall under one large topic (i.e. health), they will also end up falling under sub-categories (i.e. fitness, weight loss, dieting, etc.).
This keeps your content organized and helps your readers find more specific topics they are looking for.
Categories can be found in the “Posts” section of the lefthand menu in WordPress.
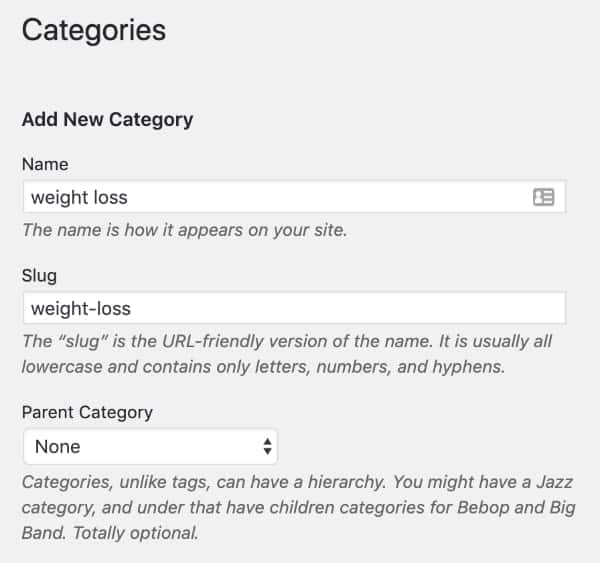
Photo: Create And Go
Add the title of your category, and edit the slug, which is what will display after your domain name.
For example, the slug in the category above for our health and wellness blog is “weight-loss,” which means that the URL looks like this: https://domainname.com/category/weight-loss/
After you have added your images and set your category, it’s time to hit the PUBLISH button!
Once you’ve done that, your blog post is officially LIVE on your website and able to be shared with others!
When you’re ready, consider sharing it on Facebook or via email to friends or family or just get started on your next post.
Here is a great article to read next with some of our best blog writing tips.
If you enjoyed this article on how to write a blog post in WordPress, please let us know in the comment section below or ask us any questions you may have!